Navigating to the Accounting Settings
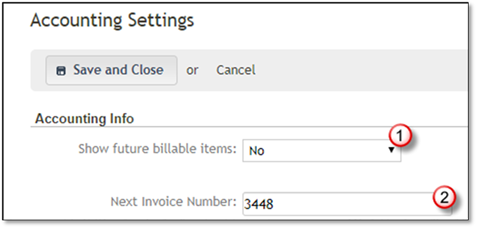
1. Show future billable items:
•This option only applies to maintenance jobs that use periodic billing. Changing this setting allows you to determine how soon in advance your periodic payment installments will be available to create invoices with.
For example, imagine you are
using a monthly payment plan with invoice dates set to the first of every month.
You can choose to make those invoices “ready for billing” on the day they are
due, a day in advance, a week in advance, or 30 days in advance. You can also
choose “all future installments” to mark all installments as billable from the
moment the job is created.
2. Next Invoice Number:
Set the invoice number to be assigned to the next invoice created. The invoice number will go up by 1 for every invoice created.

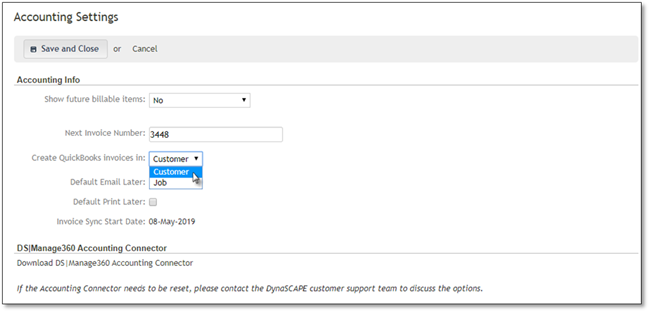
3. Create QuickBooks invoices in:
This option allows you to choose whether invoices sent from Manage360 to QuickBooks should be created directly under the Customer in QuickBooks, or if you would like the invoice to be created under a Job (Sub-Customer).
If you choose post invoices to
Jobs, then Manage360 will create Jobs in QuickBooks automatically. You have the
option of choosing when these Jobs will be created in QuickBooks.

 Note:
Note:
The invoices customers, jobs, and invoices will only be created in QuickBooks after you run the accounting connector. If the customer does not exist in QuickBooks, it will be created for you.
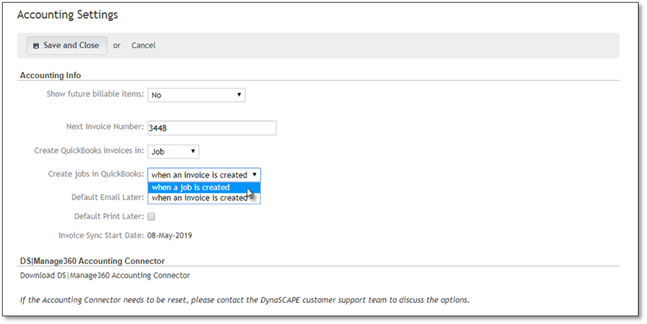
4. Create jobs in QuickBooks:
This option only appears if you have “Create QuickBooks invoices in” set to “Job”. It allows you to specify when the Job should be created in QuickBooks. Jobs can either be created in QuickBooks when the Job is created in Manage360 (upon winning an estimate) or can be created once the first invoice for the Job is created.

 Note:
Note:
The invoices customers, jobs, and invoices will only be created in QuickBooks after you run the accounting connector. If the customer does not exist in QuickBooks, it will be created for you.
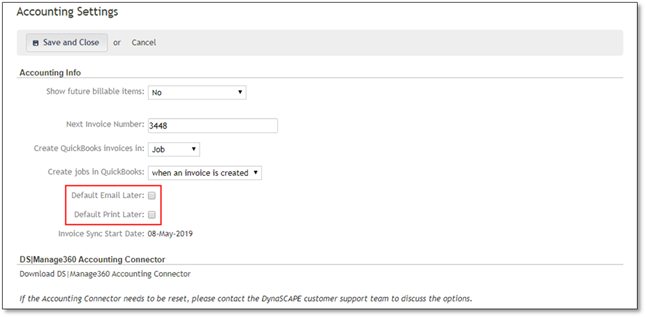
5. Default Email Later and Default Print Later:
These two options set the default/preferred method of invoice delivery for an account. This means that whenever you create a new account in Manage360, your chosen options for email later or print later will automatically be selected. These checkboxes correspond to the email later/print later options found on QuickBooks invoices.

6. Invoice Sync Start Date:
a. This option determines the cut-off date after which invoices will be eligible to be posted to QB. Any invoices with an invoice date prior to the invoice sync start date will not be posted to QB. An invoice sync start date must be set in order to send invoices to QuickBooks via the Manage360 Accounting Connector.
b. Note that this option is not directly configurable. Get in touch with your implementor or email support@DynaScape.com to discuss setting an invoice sync start date.
7. Select the Download Manage360 Accounting Connector at the bottom of the Accounting Settings page if you need to download/install the accounting connector for the first time or if you are setting it up on a new computer.
