There is no need to re-enter all of your client and proposal details into a whole new system – Job Management takes that proposal and turns it into a job, automatically. Now you can start tracking it!
In order to create a Job and start tracking it, you first have to create the Job by winning an estimate, this is done in the Estimate by choosing Estimate Won in the Tool/Actions drop down list. For more details, please see the Estimate Won section in the Estimates Area.
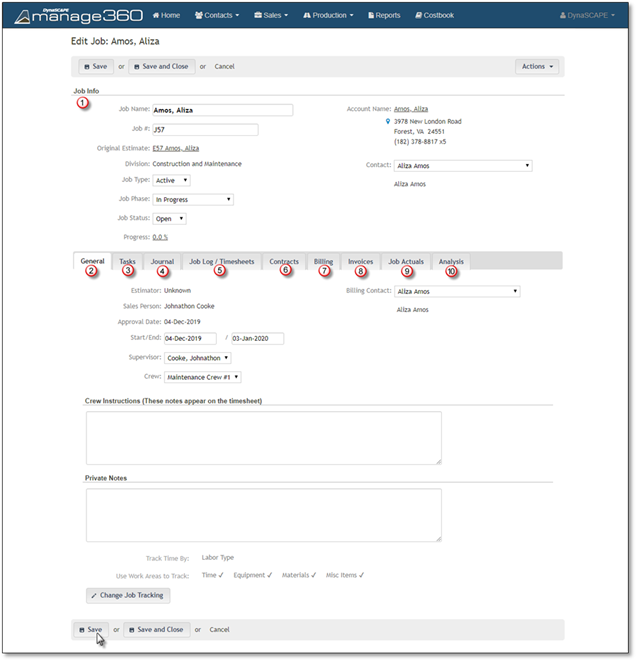
Once you have won the estimate, the newly created job will be open, and you will now be able to see the following information:

1. Job Info - The information in the Job Info area is carried over from the estimate.
The Job Name initially defaults from the Estimate name, which you are able to edit.
The Job # is the same number as the estimate but will have the Job number pre-fix as indicated by the Division settings.
You can view a copy of the estimate by clicking on the link beside Original Estimate:
The Job Type and Job Status list comes from the Job Settings.
The Contact can be changed if the account has multiple contacts.

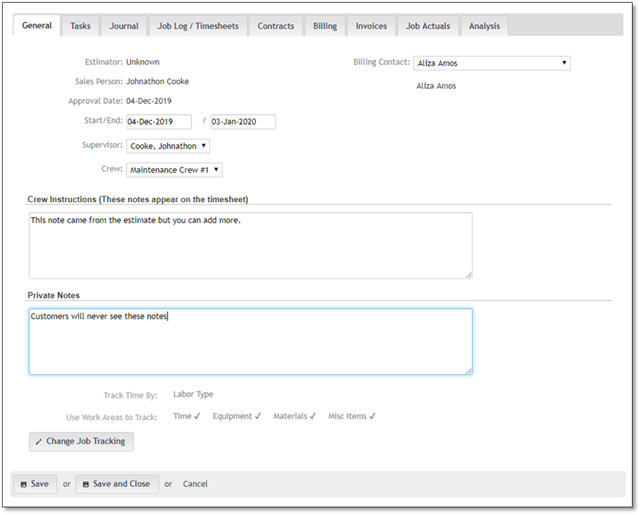
2. General Tab - The information in the General Tab is carried over from the estimate.
Clicking in the Start/End Date will result in the calendar popup you can choose the appropriate start and end date. If the actual dates are not known, then choose approximate dates and update the dates to the actual dates when the job starts and ends. This helps with Timesheet creation for a Crew as well as ensuring that the dates are not left blank at the end of the Job. It is important that the dates not be blank when a Job is complete, as it is these dates which are used in reporting on Job actuals.
The Supervisor and Crew list comes from the Settings.
The Billing Location & Billing Contact can be changed if the account has multiple locations and contacts.
If you have entered Crew Notes in the estimate, they will be visible here, otherwise you can enter the notes here or edit the ones that came from the estimate.
You can Track Time by Labor Type or Cost code, the default is setup in the Division Settings, but you can change this before any tracking happens on the Job by clicking Change Job Tracking. If you choose to track your labor time by:
•Labor Type - This would give you more detailed tracking as every labor type you use will have its own line item in the Job Log.
•Cost Code - This is less detailed because a single cost code can be linked to multiple labor types, so all labor types will be listed as a group.
You can also select to use Work Areas to Track the Time, Equipment, Materials, Misc. Items and Subcontractors.

3. Tasks - This area displays tasks specifically linked to this Job that have been added by you or by other Manage360 users. You can also click +New Task Button to add a task for this Job. For more information on tasks look over Add a Task.
4. Journal - This area displays recent activities linked to this Job such as when accounts, opportunities or estimates have been added, jobs that have been won, etc. You can create a new journal entry by clicking +New Entry. For more information on journal look over Journal Entries.
5. Job Log/Timesheet Tab - You can view any Timesheet that has been created for the Job. Timesheets are initially created from the Production – Timesheets area.

6. Contracts Tab - This is where you will see the current contract, any change orders and the original contract, if change orders have been created.
To create a change order and view the detailed information regarding Change Orders, please see the Change Order Section.

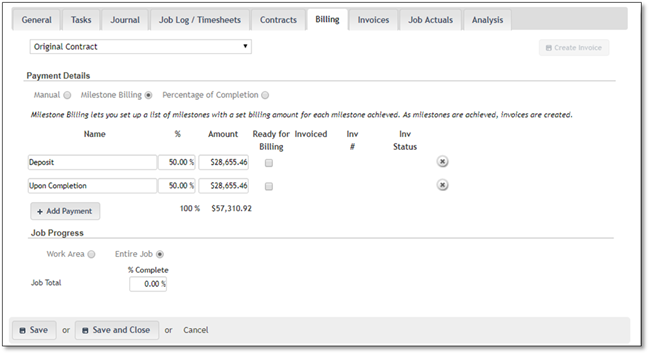
7. Billing Tab - The Payment details are carried over from the Estimates Payment Options tab - but it can be changed here if you choose to change the Payment Details.
You have the choice of changing the payment details to Manual, Milestone Billing (Milestones are set up in Settings> Estimate Settings> Payment Options) or Percentage of Completion.
You will see the amounts to be billed and you have to ability to Mark Ready for Billing, once this has been done, then the Create Invoice button will be active to create an invoice, or you can go to the Billing Area to go through the Billing/Invoicing process.
You can choose to do billing for the original contract or any of the approved Change Orders by choosing it in the Drop Down list - by default the Original Contract will be selected.
Remember to enter the % Complete under the Job Progress area which can by tracked by Work Area or Entire Job, this ensures, that whoever is monitoring the status of each job is accurate.

8. Invoices Tab - This is where you can view the Invoices that you have created for the Customer, and you can create a New Invoices not associated with the billing options.

Invoicing is the final stage of the Manage360 process flow. It represents payment for services rendered. Invoicing is completed at each pre-determined milestone as per the Billing Tab. Payments are not processed or recorded, accounts receivables are not monitored and overdue accounts are not flagged. All invoice payment and monitoring must be done through an appropriate accounting package. Manage360 is not designed to be an accounting program, but Manage360 does export information (Accounts and Invoices) to QuickBooks. For more information on using Manage360 with QuickBooks, see the section To Be Posted in the Billing section.
To view your list of customer invoices in Manage360, go to the Billing Area>To be Invoiced Tab.
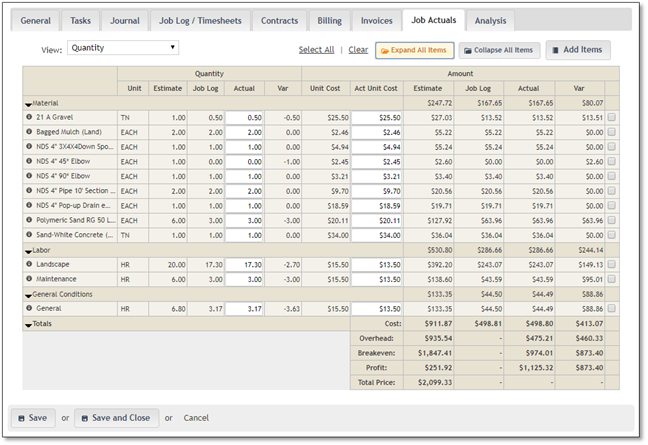
9. Job Actuals Tab - The best way to judge the accuracy of your estimating process is to be able to compare your estimates with a job’s actual costs. The Job Actuals tab will contain any information that has been entered into a Timesheet/Job Log, as well as allowing direct manual updates.
The Job Actuals tab on the job screen will provide an overview of the job and allow the user to enter in at the completion of the job the actual quantity and dollar amounts.

You are able to see the quantities and dollar amounts for estimated, job log total and actuals, along with this the estimated unit cost and actual unit cost are available.
At the end of the job, you are able to overwrite the actual fields with the correct information if there is any difference between that and the estimated.
You can add additional Costbook items by clicking the Add Items button to the Job Actuals tab just like you do within an estimate. This will allow you to enter in any substitutions or additional items that were part of this job.
The checkbox at the end signifies that this information is correct and by checking it makes it available for job cost reporting. If the rows are not checked, then the Job Cost – Details report will not have the information.
This feature will also allow companies who do not use the Timesheet functionality to enter the actual costs for the job without time sheet entry and be able to do job cost reporting.
Totals section allows you to see the total comparison between estimate and actual dollars for the full job, click on the expand button besides the ‘Totals’ and the total figures will appear.
10. Analysis Tab - Compare and analyze estimated vs. actual costs on a graph to see if the job on track or if you under-estimated the costs. The system also includes powerful reporting capabilities that let you drill down and filter reports in many different ways, at 5 different levels. View data from the perspective of a specific sales person, foreman, crew, job, or work area.