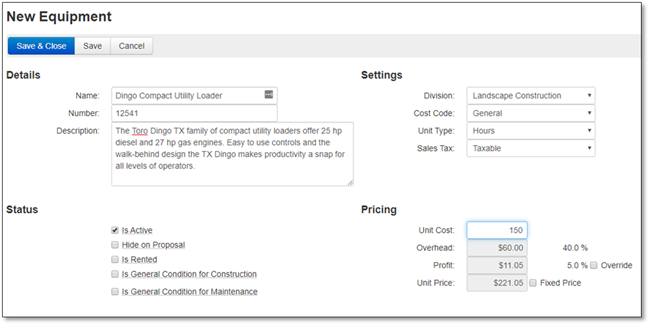
You can create an Equipment Item in the Costbook by following these instructions:
1. Click on Costbook.
2. Click on Equipment.
3. Click the New Equipment button to open the input screen.
4. Once the Equipment input screen appears you can enter the following:
Details section: Enter the Name, Number and Description (optional).
Settings Section:
Choosing the Division will set the corresponding Purchasing Tax & Sales Tax, but you can choose to change this tax.
You can choose a Cost Code which is used for tracking job costs on your Timesheet/Job Log, if you have the Job Management Module.
Choose the Unit Type from the drop down list.
Status Section:
You can choose to set this as a Active(Inactive).
You can choose to Hide on Proposal if you do not want to see this item on your proposal.
If the equipment is rented check the Equipment is rented checkbox, which will allow you to select a Supplier and specify a Purchasing Tax.
You can choose to set this as a General Condition, which enables this cost to then be spread across the estimate automatically, so they are evenly distributed across your different work areas.
Pricing Section: You can change the following:
Enter the Unit Cost.
The Overhead amount is set for the division in the Company Settings
You can override the default profit margin by clicking on the Override Profit Margin checkbox and entering the profit percentage manually.
The system will add the Overhead and Profit to the unit cost to calculate the price.
You can override the price by clicking on the Use Fixed Price checkbox and entering a price manually.
Default Billing Section: The way the way that the item will be billed to the customer. Future modules will have different billing options.

5. Click the Save button to save the equipment item to the Costbook or Cancel if you would like to discard the entry.