
A Timesheet is created from the Timesheet area in the Production Section. A Timesheet is created for each Crew for a single day.
1. Go to the Production Area.
2. Select Timesheets.
 Note:
Note:
The page will open with the Default View of "All Today's Timesheets".
3. Click on New Timesheet, the following will appear. The date will default to today's date, and the Crew will be the first crew (sorted alphabetically).

4. Choose the Date and the Crew for this Timesheet, then Click Create Timesheet or Cancel which will take you back to the Timesheet screen. Manage360 will look for any jobs that the selected crew has been assigned to for the chosen date and automatically add it to the Timesheet.
5. Once the Timesheet is open, you will see the following areas:
a. Simple and Advanced View Buttons - The new Timesheet opens in the Simple view by default, when you click Advanced the following appear:
•Timesheet Section: you will be able to see the Total Time and Job Log Time column as well as a Delete button to remove a Job, Work Order or Non-Billable item
•Employee Section: you will be able to see the Unpaid and Non-Billable Paid time.
Note:
Approved Timesheets will open in Advanced View by default.
b. Actions drop-down menu - Will provide you the options to Delete or Print Timesheet. It will also have the revert status option once the Timesheet status changes.
c.
Employee Delete and
Add buttons - You can remove or add employees, if needed.
Click the  button to add Employees
to this Timesheet. Click the
button to add Employees
to this Timesheet. Click the  button
to delete an Employee from this Timesheet.
button
to delete an Employee from this Timesheet.
d. Equipment Notes/General Comments section - Used for notes from the supervisor to the crew or notes from the crew such as “had a flat tire”.
e. Employee Summary - Will allow you to see the Employees that are on this Timesheet and will show the Start time and the End time based on what is entered in the Job Log and Paid Column which is also calculated based on the time entered in the Job Log.
Note:
Highlighted rows require attention or corrections, mouse over the row to see the details.

6. Timesheet Section: The Timesheet will open with Jobs that have a Start/End date that are within this date and/or Work Orders that were scheduled on this date, and/or unfinished jobs for this crew.
If you have not added Start/End dates to the Jobs or entered a Scheduled Date in the Work Order then you can add Jobs, Work Orders, and Non-Billable items manually by using the search feature, as shown below. You can also create a New Work Order by clicking the + New Work Order button.
Lunch is a default Non-Billable Item,
but it can removed if necessary, using the button while in the Advanced
View.
Search Feature:
A.
The Search Feature can be used by starting to type the Job Name, Work Order Name
or Non-Billable Item name in the row that has this icon  .
.
B. Click on the Job Name, Work Order Name or Non-Billable Item that matches what you are looking for.
C. Click +New Work Order if you want to add a New Work Order to the Timesheet. Please see the Create New Work Orders section in the Work Orders Area.

7. You can enter the Start/End times for each Job, Work Order or Non-Billable Item as shown below, so that it pre-populates the Job Log Entry screen, or you can enter the Start/End time for employees individually by going into the Job Log.

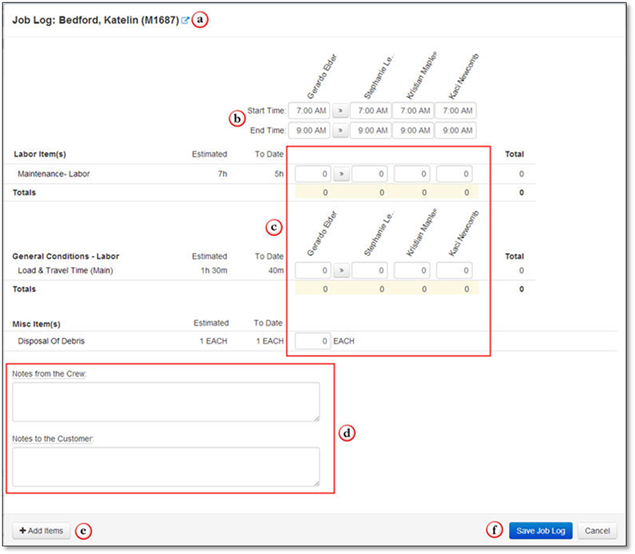
8.
Enter Job Log
Information - The Job Log can be accessed by clicking on the Job
Name denoted with this icon  . While in the
Job Log you can open the Job in a new window, enter Start/End Times, the
quantities of items used, time for labor, Notes from the Crew, Notes to the
Customer and you can add items that you used on the job that weren't in the
original estimate, all this is shown below:
. While in the
Job Log you can open the Job in a new window, enter Start/End Times, the
quantities of items used, time for labor, Notes from the Crew, Notes to the
Customer and you can add items that you used on the job that weren't in the
original estimate, all this is shown below:
a. View Job in New Window: Clicking on this is link will open the Job in a new Window. After you are done with the Job, click Save and Close or Cancel to bring you back to the Job Log Entry screen.
b.
Entering Start/End
Times: If the Start/End Times were not entered on the Timesheet
Screen, you can now enter it for each employee, or if they all worked the same
time, enter it in for the Foreman, then click the  button to push the time across to the other
employees.
button to push the time across to the other
employees.
c. Entering Quantities Used and Labor Time: This section will contain the item information where you can enter the quantities used or enter time for labor or you can add items that you used on the job that weren't listed on the original estimate.
Note:
After the Start/End times have been entered, you must enter the Labor Hours to match the duration. If the totals are greater than the ‘Expected time’ then the Job Log cannot be saved.
d. Entering Notes: You may enter Notes from the Crew and Notes to the Customer from here. These will appear on the Timesheet when you print it out.
e. Adding items: Clicking the +Add Items button will open the Add Items to the Job Log Window where you can choose to add any Costbook items to the Job Log.
f. Saving or Canceling Job Log Entries: Click the Save Job Log to save your entries OR Click Cancel to discard the entries. Each will bring you back to the Timesheet.
Note:
It is important that the Start and End times on the Timesheet match up exactly to the corresponding Job Logs Earliest Start time and Latest End time.
9.
Enter Work Order
Detail Information- Click on the Work Order Name, which is
denoted with this icon  . While in
the Work Order Detail screen you can open the Work Order in a new window, Expand
or Collapse all the items, you can add items that you used on the Work Order
that weren't in the original and you can delete items from the Work Order, all
this is shown below:
. While in
the Work Order Detail screen you can open the Work Order in a new window, Expand
or Collapse all the items, you can add items that you used on the Work Order
that weren't in the original and you can delete items from the Work Order, all
this is shown below:
a. View Work Order in New Window: Clicking on this is link will open the Work Order in a new Window. After you are done with the Work Order, click Save & Add to Timesheet and Close or Cancel, then close the Window to come back to the Work Order Detail screen.
b. Change the Sub Status: Click on the drop-down List to set it to one of the Open, Closed or Cancelled Sub Statuses.
c.
Entering Start/End
Times: If the Start/End Times were not entered on the Work Order
or the Timesheet Screen, you can now enter it for each employee, or if they all
worked the same time, enter it in for the Foreman, then click the button to push the time across to the other
employees.
d. Adding items: Clicking the +Add Items button will open the Add Items to the Work Order Window where you can choose to add any Costbook items to the Work Order.
e.
Modify or Remove
Items: Click on the  button beside the Item you'd like to edit. In the Edit pop up, you will be
able to change things like the Name, Quantity and Price in the Simple View, but
if you'd like to change the Cost, Purchasing Tax, Total Price or to Remove Item,
click the Advanced View button. You can also click on the Purchasing or
Sales Tax name while in the Work Order Detail screen to change the tax. If
you'd like to Remove an Item while in the Detail screen, simply click on
the button. To adjust the Subtotal or enter a Discount, you can
click on the Subtotal dollar amount to type in a new amount and you can click in
the Discount % box to enter a percent or click on the Dollar Amount and type in
a new amount.
button beside the Item you'd like to edit. In the Edit pop up, you will be
able to change things like the Name, Quantity and Price in the Simple View, but
if you'd like to change the Cost, Purchasing Tax, Total Price or to Remove Item,
click the Advanced View button. You can also click on the Purchasing or
Sales Tax name while in the Work Order Detail screen to change the tax. If
you'd like to Remove an Item while in the Detail screen, simply click on
the button. To adjust the Subtotal or enter a Discount, you can
click on the Subtotal dollar amount to type in a new amount and you can click in
the Discount % box to enter a percent or click on the Dollar Amount and type in
a new amount.
f. View the Work Order Analysis: To View a quick analysis of the Work Order, click on the Work Order Analysis link to open the Analysis, which will show you the Cost, Overhead, Breakeven, Profit, Customer Pays, Labor and the Hourly Revenue based on what is on the Work Order.
g. Create an Invoice: If the Status is set to a Closed Sub-status, then the Create Invoice Button will be clickable, full details can be found in the Work Order Area under the Create a Work Order Invoice Section entitled B. Close a Work Order within a Work Order.
h. Saving or Canceling Entries/Edits: Click the Save Work Order to save your entries OR Click Cancel to discard the entries and edits. Each will bring you back to the Timesheet.

10. Now you have 4 options after you are done with your Timesheet.
•If you are done with your Timesheet, click Save and Close
•If you are done with your Timesheet and are ready to approve it, click Save & Set Ready for Approval
•If you need to leave the computer for a few minutes, click Save
•If you want to discard the additions, click Cancel.
After you have completed entering all your time and material for this Timesheet, you can then go onto approving the Timesheet(s), please see the Approve a Timesheet Section for further details.