To create a Service, follow these steps:
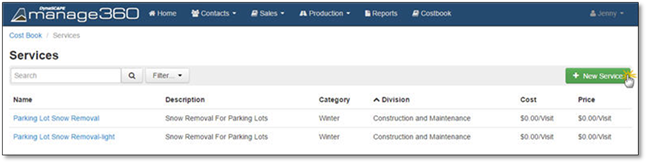
1. Go to the Costbook.
2. Click on the Services link.
3. Click the + New Service button to open the input screen.
4. The Service Detail Screen is displayed, and the following information can be entered:
The Name would be the type of service and the Display Name is pre-filled with the Name entered but can be changed, the Display Name is used on the Proposal.
Optionally you can enter a Description - seen only within the system, Crew Instructions - for the crew performing the service or Customer Description - the customer will see these notes on Quotes, invoices, etc. Click on the "Click to add text..." message, add your notes and click Done if you'd like to retain the notes or Cancel to discard your additions.
The Optional check box determines if this will be an optional service that will be added to the Maintenance Estimate automatically.
Choose the Division if you have more than one if you only have one maintenance division this will be default
Choose the appropriate Service Category, if you need to edit or add Service Categories, you can go to Settings>Service Categories.
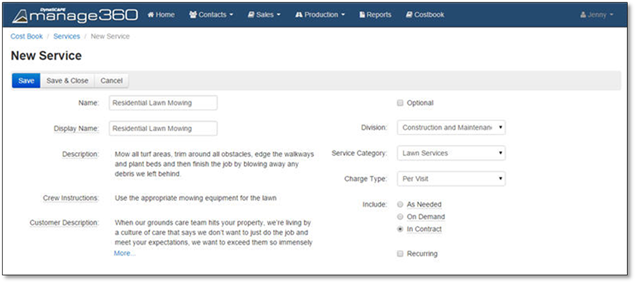
Choose Charge type how would you like to charge for this service Per Visit (a preset flat rate for the service) or by Time and Material (depends on how long and the quantity of materials used).
a) If you choose Per Visit you will need to determine if this service is going to be As Needed, On Demand or In Contract.
•As Needed means the crew will determine if this service is needed and whether it should be performed
•On demand means the customer will request it and at that point you can provide the service
•In Contract means the service will be scheduled as part of the standard contract. When choosing In Contract you will get the option to selecting Recurring. If you select this, the service will repeat. Select the frequency of the repetition:
o Daily - Enter every (how many) days
o Monthly - Enter every (how many) months
o Per Contract
o The number of default visits for the service
o The maximum number of visits for the service cannot be less than the Number of Visits.
o Weekly - Enter every (how many) weeks

b) If you choose Time and Material, you will only have the choice of As Needed and On Demand.
5. After inputting your Service information, you have 3 options as outlined below:
•If you need to leave the computer for a few minutes or are ready to continue with editing the Details, Notes or add Items, click Save

•If you are done creating the new Service and want to go back to the Service list, click Save and Close
•If you want to discard the addition, click Cancel.
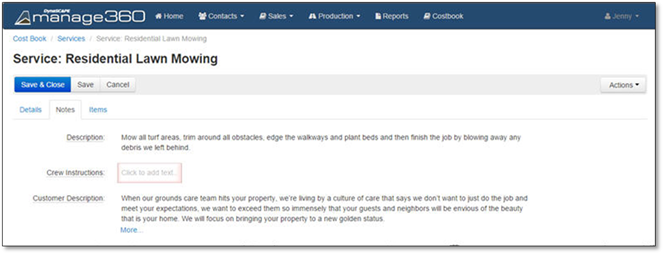
6. Viewing or Editing the Service Details:
After clicking Save or opening a Service, you can edit the following:
The Name would be the type of service and the Display Name is pre-filled with the Name entered but can be changed, the Display Name is used on the Proposal.
The Optional check box determines if this will be an optional service that will be added to the Maintenance Estimate automatically.
You can choose to make this inactive or active.
Choose the Division if you have more than one if you only have one maintenance division this will be default
Choose the appropriate Service Category, if you need to edit or add Service Categories, you can go to Settings>Service Categories.

Choose Charge type how would you like to charge for this service Per Visit (a preset flat rate for the service) or by Time and Material (depends on how long and how much materials are used)
a) If you choose Per Visit you will need to determine if this service is going to be As Needed, On Demand or In Contract.
•As Needed means the crew will determine if this service is needed and whether it should be performed
•On demand means the customer will request it and at that point you can provide the service
•In Contract means the service will be scheduled as part of the standard contract. When choosing In Contract you will get the option to selecting Recurring. If you select this, the service will repeat. Select the frequency of the repetition:
o Daily - Enter every (how many) days
o Monthly - Enter every (how many) months
o Per Contract
o The number of default visits for the service
o The maximum number of visits for the service cannot be less than the Number of Visits
o Weekly - Enter every (how many) weeks.

b) If you choose Time and Material, you will only have the choice of As Needed and On Demand.
7. Viewing or Editing the Service Notes.
Click on the "Click to add text..." message, add your notes and click Done if you'd like to retain the notes or Cancel to discard your additions. Now you can enter or edit:
Description - seen only within the system.
Crew Instructions - for the crew performing the service.
Customer Description - the customer will see these notes on Quotes, invoices, etc.
8. Items Tab in the Service
If you choose Charge type: Per Visit, then your column headings will be shown as below, if you choose Time & Material then /Visit will not be seen.
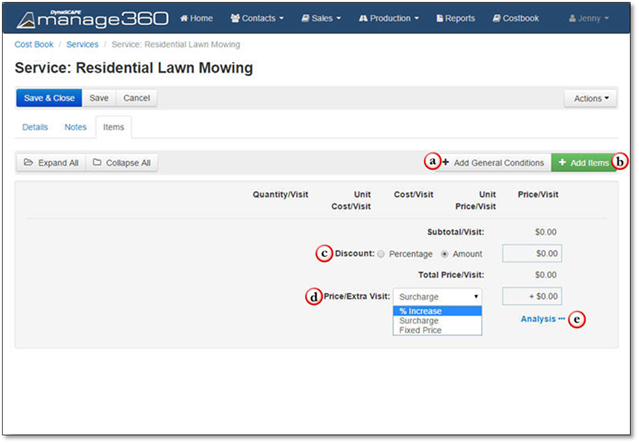
a) Add / Edit General Conditions to a Service
General conditions are things such as travel time, load and unload, and daily cleanup which can be automatically added to your estimate based on the number of days the job will take and the number of workers per crew. These general conditions can then be spread across the Service automatically, so they are evenly distributed across the included services. Adding General Conditions to a Service, can be done through the Add General Conditions button in the Service Items screen. As long as the Costbook items have setup to be included in your list of General Conditions, you will see them in the Add/Edit General Conditions screen, if you have items that are not setup yet, you can set them up by following the instructions in the Setup item as General Condition section in the Costbook.
To Add specific items to the General Conditions without Setting them up as General Conditions follow these steps:
1. Click on Add General Conditions.
2. Click +Add Items.
3. Select the item type from the list of tabs across the top of the screen (Equipment, Materials, Labor Types, Subcontractors, Misc. Items).
4. The system will then load the entire list of these items from the Costbook. These can be further filtered by Favorites, Division, Category and/or Supplier for certain items.
5. Click the name of the item you wish to add to the Service.
6. After you have clicked on an Item to add to the Service enter the quantity of this item that will be required for the General Condition.
7. To edit the Cost of some Items or to see more information click on Advanced.
8. Click Add (Equipment, Materials, Labor Types, Subcontractors, Misc. Items) to add the item to the General Conditions.
9. Continue adding items by repeating the above steps.
10. These items will be added to the section Selected Items on the right hand side of the Add General Conditions to Service screen.
11. Click Add Items to add all the selected items to the Service or Cancel to disregard the additions, you will be brought back to the "General Conditions" Items Tab.
12. Click Apply Changes to keep the items added or Cancel to discard the addition.
To add Items to a service, open an existing service or Create and Save a new service.
1. Click on the Items tab.
2. Click +Add Items.
3. Select the item type from the list of tabs across the top of the screen (Kits, Equipment, Materials, Plants, Labor Types, Subcontractors, Misc. Items).
4. The system will then load the entire list of these items from the Costbook. These can be further filtered by Favorites, Division, Category and/or Supplier for certain items.
5. Click the name of the item you wish to add to the Service .
6. After you have clicked on an Item to add to the Service enter the quantity of this item that will be required for the Service.
7. In the case of Material or Plant Items you can add them as kits and or include or not include planting labor. To review these options, click on Advanced and make the necessary selections.
8. Click Add(Kits, Equipment, Materials, Plants, Labor Types, Subcontractors, Misc. Items) to add the item to the Service.
9. Continue adding items by repeating the above steps.
10. These items will be added to the section Selected Items on the right hand side of the Add Items to Service.
11. Click Add Items to add all the selected items to the Service or Cancel to disregard the additions, you will be brought back to the "New Service" Items Tab.
12. Click Save or Save and Close to keep the items added or Cancel to discard the addition.
 Note:
Note:
Kits can only be added from the Services division.
c) Discount
You can choose to give a Percentage Discount or an Amount for Discount by clicking on either of the choices, then typing in the amount.
d) Price/Extra Visit
This option will be seen if you chose Charge Type: Per Visit & Include: In Contract & Recurring: Daily, Monthly, Per Contract or Weekly. If you go over the maximum number of visits then you would choose what price you will charge from one of the options: % Increase, Surcharge or Fixed Price
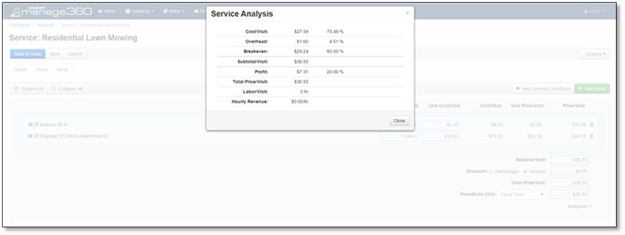
e) Analysis
You can click on Analysis to see the Cost/Visit, Overhead, Breakeven, Subtotal/Visit, etc.