
To create a Work Order, follow these steps:
1. Click on the Production Menu.
2. Click on Work Orders.
3. Click on + New Work Order.

4. Find an Existing Account or Create a New Account.
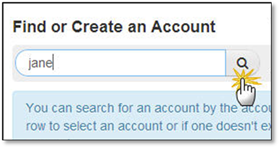
To Find an account, type in some text in the search box and click on the Search button.
 Note:
Note:
You can search for an account by the account name or address or
by contact names, phone numbers or email addresses.
The list will be limited
to a maximum of 200 accounts.
5. Click the Account Name to select an account or if one doesn't exist, click + New Account to create a new one.
6. The New Work order entry screen will appear with the Account and Primary Contact information and now you will be able to enter the following:
•Work Order name (required) our current recommended naming convention is Year - Division - Account Identifier - Service e.g., 2014 - IRR - Doe - Line Repair.
•Scope of Work: Details of work to be done appearing on Customer Invoice, once the Work Order is saved these can be found in the Notes tab.
•Sales Person: Choose the Sales Person that created the work order.
•Division: Choose the Division this Work Order will be in.
•Job Type: This is set to Active by default, but you can change it too Inactive. Active and Inactive are just options from the Job Type in Settings and not specific to everyone.
•Status: This is set to Open by default, once you save this you can change this to Closed or Cancelled.
•Sub Status: This is set to Confirmation Required by default & Confirmed is the other option. Sub Statuses are dependent on the Status option, here are the Status and Sub Statuses that go with:
•Open Sub Statuses will be Confirmation Required & Confirmed
•Closed Sub Statuses will be Completed as Requested & Completed with Follow up Required
•Cancelled Sub Status will be Service No Longer Required.
Note:
Manage360 will have 3 Statuses and 5 system Sub Statuses. New Sub Statuses can be creating by going to Settings> Sub Statuses.
Start Date/Time: You can choose a date and time by clicking in the text box which will open the Calendar and time picker, or you can type a date in the Start Date/Time field in different formats. Examples of date/time formats that you can use DD-MMM-YYYY HH:MM AM/PM OR 24 hour time DD-MMM-YYYY HHMM, Full Month Name DD, YYYY or MM/DD/YYYY.
Arrival +/-: This is the possible time variation on either side of the Work Order Date/Time. The Arrival window (in minutes) for new work orders is set in the Configuration Settings under Work Orders.
Duration: This is the length of time that this Work Order should take. Duration (in minutes) for new work orders is set in the Configuration Settings under Work Orders.
Assigned to: By Default, this will be set to (Unassigned), you can choose a crew that is in the division.

7. Now you have 3 options after you are done entering your Work Order details.
•If you need to add more notes and add Items to the Work Order, or need to leave the computer for a few minutes click Save, continue to step 8
•If you are done with entering your Work Order details, click Save and Close
•If you want to discard the additions, click Cancel.
8. After you click Save you will be able to view the Work Order Details, Add Notes and Add Items to the Work Order.
A. Work Order Details - In the Work Order Details Tab, you can view and edit the Work Order Details, the following are editable:
•Work Order Name - Our current recommended naming convention is Year - Division - Account Identifier - Service e.g. 2014 - IRR - Doe - Line Repair
•Status/Sub-Status - You can change this to any of the Open, Closed or Cancelled Sub Statuses
•Start Date/Time - You can choose a date and time by clicking in the text box which will open the Calendar and time picker, or you can type a date in the Start Date/Time field in different formats. Examples of date/time formats that you can use DD-MMM-YYYY HH:MM AM/PM OR 24 hour time DD-MMM-YYYY HHMM, Full Month Name DD, YYYY or MM/DD/YYYY
•Arrival Window - This is the possible time variation on either side of the Work Order Date/Time
•Duration - This is the length of time that this Work Order should take
•Assigned to: By Default, this will be set to (Unassigned), you can choose a crew that is in the division.

B. Notes - In the Notes tab, you can enter and edit notes into the text boxes by typing in directly or by copying and pasting from a text editor. These notes are not mandatory. The Notes tab has the following editable areas:
•Scope of Work: Details of work to be done appearing on Customer Invoice.
•Private Notes: Notes that are private to the system and can only be viewed here.
•Crew Instructions: These are the instructions for the crew and will appear on the printed Work Order Report and Timesheet Report.
•Crew Notes: Feedback and comments from the crew, will contain any information that the office needs to be aware of.
•Notes to Customer: Notes for the Customer that will be displayed on Quotes and Invoices.
Click on the "Click to add text..." message, add your notes and click Done if you'd like to retain the notes or Cancel to discard your additions.

C.
Items
- In the Items tab you can +Add Items, and once
items are added you will be able to Expand all and
Collapse All
the items as well as see the Work Order
Analysis
After clicking the + Add Items button
you can add Kits, Equipment, Materials, Plants, Labor, Subs, and Misc. Items,
each are outlined in their respective areas.
Click on the Tab for the
category of Costbook item that you would like to add:

Click Add Items when all of the new items have been selected or Cancel to discard the addition.
You can click on Work Order Analysis to see the Cost, Markup, Subtotal, etc.
D. Actions Menu - In the Actions menu you have the options of:
1. Create invoice - After you have completed the work you will need to set the Work Order status is Closed to enable this option.
2. Create Follow Up Work Order - After you have created and saved a Work Order, you be able to Create a Follow-up work order, if the customer needs a follow up.
3. Delete Work Order - If you created a Work Order and you find it is no longer needed, you will have the option to delete the work order.
4. Print Work Order - After a Work Order is completed, you can print it to give to the crew before they go out to do the work.
For further details please see the Actions Menu area.