
The initial creation of an estimate is a simple task. There are several ways to add estimates and they are outlined below:
OPTION 1: You can create an Estimate from the Account, see step 10 a. Create an Estimate
OPTION 2: You can create an Estimate from the Opportunity, when creating a new opportunity, you can Save and Create a Construction Estimate OR while editing an opportunity you can click Add a Construction Estimate from the Construction Estimates Tab.
OPTION 3: You can create an Estimate from the Sales Menu as shown below:
1. Click on the Sales Menu.
2. Click on Construction Estimates option.
3. Select New Estimate.

4. Select the Opportunity that the estimate will be based on.

5. Select the Estimate Template that is closest to what this estimate will be. If none choose a blank estimate.
To learn how to create your own estimate templates go to Save as Template.

The Estimate will open, and you will be able to change any information in the General Info screen, you can change or create notes, you can start to add items to the Estimate, and you can view or change the Payment Options.
6. General Info Tab - In the General Info area, the following are the few non-editable areas and editable areas :
Account Name - This will open the linked Account.
Estimate name - You can change the Estimate name by typing into the Estimate Name area, this will default to the Opportunity Name.
Estimate Number - The Estimate Number is generated by the system, provided that you have configured the Estimate Number in the Division Settings.
Opportunity - This will open the linked Opportunity.
Opportunity Type - The Opportunity Type is non-editable but can be edited from the Opportunity area.
Division - The Division is non-editable but can be edited from the Opportunity area.
Status - This is the Status of the linked Opportunity(not of the Estimates).
Estimate is Active - The Estimate is Active will automatically be set to active and will be checked as long as the estimate has not been won. The estimate will become inactive automatically when this estimate becomes a job or if a new version is created.
Estimate Date - The Estimate Date will default to the date that is was created, but you do have the option to edit this date, this date will be displayed on the Proposal.
Days to Expiration - The Days to Expiration is generated by the system, provided that you have configured the Default Days for Estimate to Expire in the Division Settings. Otherwise, these days will be calculated based on the Expiration Date minus Estimate Date.
Expiry Date - The Expiry Date is the date on which this estimate expires (pricing valid until the Expiry date for example).
Sales Person - The Sales Person will be set based on the Salesperson in the Opportunity, but you can change the person who is preparing and delivering this estimate.
Designer - The Designer will be set based on the Designer in the Opportunity, but you can change this if the Designing will be assigned to someone else.
Estimator - The Estimator will be set based on the Estimator in the Opportunity, but you can change this based on the person who is preparing or creating the estimate.

7. Notes Tab - In the Notes tab, you can enter and edit notes into the text boxes by typing in directly or by copying and pasting from a text editor. These notes are not mandatory but if any changes are made you must click Save in order to keep the notes that you enter. The Notes tab has the following editable areas:
Opportunity notes - These notes come from the Private Notes that may have been entered when the Opportunity was created, but you can edit or remove these notes.
Proposal Notes - These are notes that will appear when you View and Print the Proposal for this estimate only. This text box has an editor that allows you to format the text that you enter.
Crew Notes - You may enter notes for your crew here, the notes that you enter will show up on the Timesheet Job Log(s) that are associates with this estimate, if you have the Job Management Module. These can be printed on the Work Order Report, if chosen.

8. Items Tab - In the Items tab you will be able to build your estimate by adding items, but you will also be able to change your view, expand all the items so that you can see all your items at once, or collapse all the items. The Add items button will pop open a screen where you will be able to add your Costbook Items. The Add General Conditions button will also pop open a screen where you can add all or some of your General Conditions.
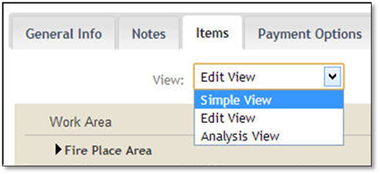
View drop down menu: Simple View will be used by default, but you can change this to Edit or Analysis, each are explained below:
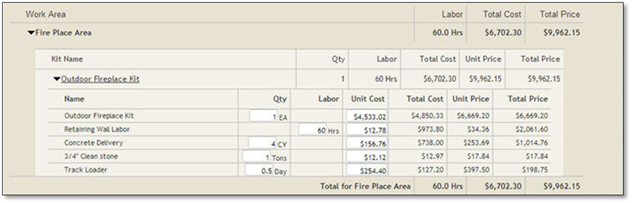
Simple View: The Work Area row will show Work Area, Labor Total Cost and Total Price and the next row will show the Kit Name, Qty, Labor, Unit Cost, Total Cost, Unit Price and Total Price.
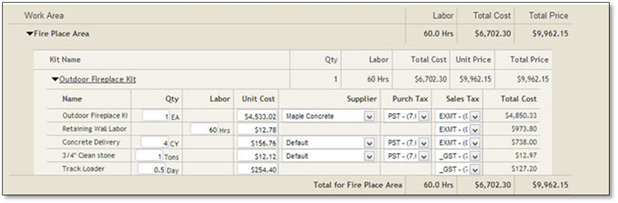
Edit View: The Work Area row will show Work Area, Labor Total Cost and Total Price and the next row will show the Name, Qty, Labor, Unit Cost Supplier, Purch Tax, Sales Tax and Total Cost.
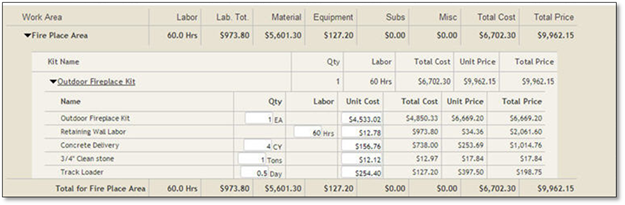
Analysis View: The Work Area row will show the Work Area Name, Labor, Lab.Tot., Material, Equipment, Subs, Misc., Total Cost, Total Price, the next row will show the Kit Name, Qty, Labor, Total Cost, Unit Price and Total Price.
Expand All Items and Collapse All Items: Clicking either of these buttons will expand or collapse the Work Areas and Kits so that all the Items are shown.
Add Items Button: A new estimate that has been created from a blank template will not have any Costbook items when you click on the Items sub-tab. If you choose an estimate template that contains items, the new estimate will always start off with those items. You can add Costbook items by following the next steps:
Select the Items tab.
Click on Add Items.
After clicking the Add Items button you can add Kits, Equipment, Materials, Plants, Labor Types, Subcontractors, and Misc. Items, each are outlined in their respective areas. Click on the Tab for the category of Costbook item that you would like to add:

Click the + Add General Conditions button - If you’re doing cost-based estimating, you can recoup your costs for all of the extras of a job, like permits, bins, travel times, site access, load/unload time, site cleanup; all these hidden costs can be recovered under the category of General Conditions, this will ensure that you don’t lose any money on these essential but often overlooked items, whether you choose to show them on an proposal or not. For detailed information, please see Adding or Editing General Conditions.
9. Payment Options Tab - In the Payment Options tab you can change the type of billing that will apply to this customer, the options are outlined below and for detailed information please see the Editing Payment Options section:
Manual - All Jobs that have the billing set to manual will only be invoiced when you create an invoice manually.
Milestone Billing - Milestone Billing lets you set up a list of milestones with a set billing amount for each milestone achieved. As milestones are achieved, invoices are created. If this is chosen the payment options will appear on the proposal.
Percentage of Completion - Percentage of Completion billing creates Invoices based on the percentage completion of the job. This can be broken down by work area or across the whole job.

10. Now you have 3 options after you are done with your Estimate.
•If you need to leave the computer for a few minutes, click Save
•If you are done with your estimate , click Save and Close
•If you want to discard the additions, click Cancel.