To create a new Route, open the Routing menu from Production > Routing. From here, you will see a list of your created Routes, along with a "+ New Route” Button in the top right corner. Click on this button to get started on a new Route.
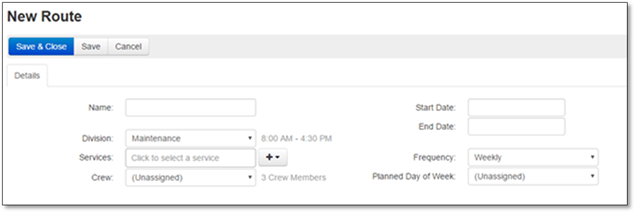
The next step is to enter the general information about the Route. Give the route a Name, choose the Division that you will be working in (if you have more than one Maintenance Division), and pick the Services that are to be included in this Route. You can pick them one by one through the drop down list, or bulk assign all Services within a Service Category by selecting the Service Category from the + drop down list. Assigning the Route to a Crew is optional. The Route requires Start & End Dates that align with the Start/End Dates of the services you will be providing. A Route cannot exceed 1 year in length – when it comes time to renew your contracts, a new Route must be created.
Next, select the Frequency of the Route Occurrence. There are 5 options here:
•Daily: This Route occurs every day.
•Weekly: The Route occurs once per week.
•Biweekly: This Route occurs once every other week.
•Monthly: This Route occurs once per month.
•Manual Scheduling: There is no recurrence pattern for this Route and all Occurrences are scheduled one by one.
The important thing here is to select the recurrence pattern that matches that of the Services you will be using. This will determine the Services that can be added to this Route. As an example, you cannot have a Weekly Service on a Monthly Route. You may also select a planned day of the week, if applicable.
Once you have the initial details of the Route set up, save the Route. The screen will refresh, and you will now be able to access the rest of the Route settings.
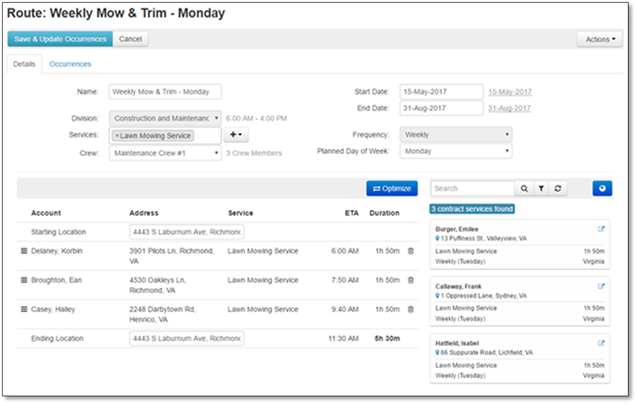
The bottom left side of the screen contains the area where all stops along the route will be set up. When creating a brand new Route, only the starting and ending locations will be listed initially. Both locations default to your company address set up in Settings > Company Information. Type in a new address if you wish to change either location.
On the bottom right, all contracted visits fall within the start and end dates, as well as the frequency of the Route will be listed. These are the services that can be used on the Route.
If the list is too large to scroll through and select the services you need, you can also search for services by Account Name, Address, or Service Name. There are also filters available for finding Services of a particular Preferred Day, Region, City or Account Type. Services that are already on other Routes will not show up on this list unless you open the filter and select “Show services on other routes”. This is to prevent accidentally adding the same service to multiple Routes.
To add Services to the Route List, click and hold your mouse cursor on the service from the list and drag it onto the Route List.
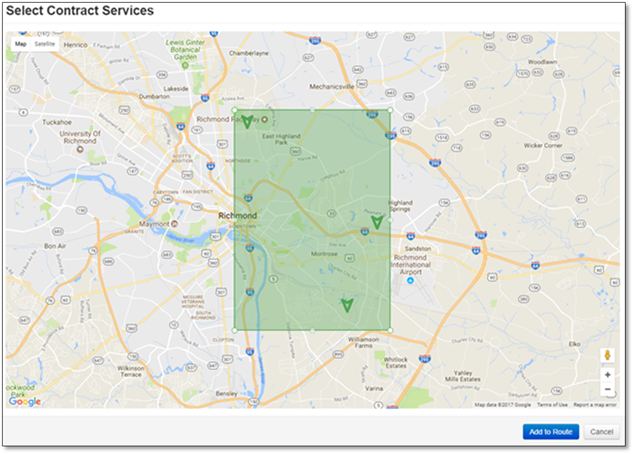
Another option for adding Services to the Route list is selecting them by location. Click on the globe icon above the Contracted Services list, and it will open a new window displaying all Services on the list on a Map. Drag the points on the green border to capture all Services within the “net” and select Add to Route. If you encounter any errors here, double-check that your account addresses are entered correctly.
Once you have added all your services to the Route, you can rearrange them by clicking and dragging the ≡ icon on the left side of the service. You can also click on the blue “Optimize” button to have Manage360 automatically determine the optimal order for the Route. To remove a service from the Route list, click on the trash can icon to the right of the service and confirm that you want to remove the service from the Route.