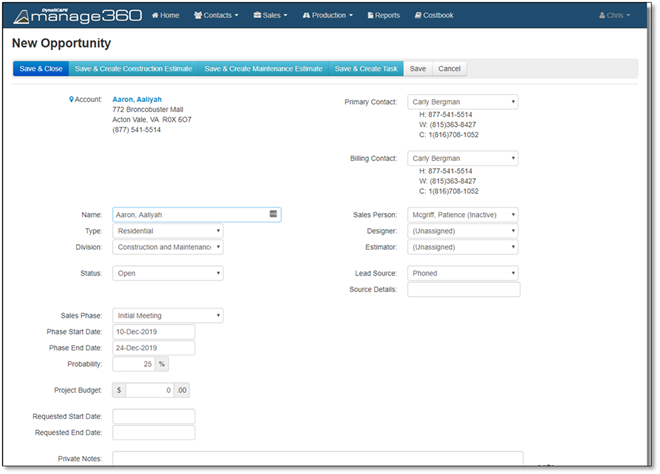
To create an opportunity, follow these steps.
1. Click on the Sales Menu.
2. Click on the Opportunities option.
3. Click on the New Opportunity button.

4. When the Opportunities list is displayed.
5. Search for the name of the account or navigate through the pages.
6. Select the account you wish to create an Opportunity for
Option 1: If the Account is not on the list you may click on New Account and Create a New Account.

Option 2: If the Account is on the list, select the customer.

If you selected an existing Account most information will be filled in, but it is recommended to fill in any additional information.
Entering Opportunity Information:
The Name will default to the account name, but we suggest using the following naming convention of "Account Last Name - Type of Work - Year".
The default Contact for the Account will be chosen but if there is more than one Contact you can choose it here or enter more by adding a contact in the Edit Account Information area.
The Division that is first alphabetically will be chosen, choose the correct division as this will be chosen when you create an estimate.
The default Opportunity Type will be chosen but you can change this by selecting from the list.
The Status is chosen automatically by the system as open, and changes based on what occurs with the Opportunity.
Select the appropriate Sales Person from the dropdown – the sales person that is chosen at the customer level will be default.
Select a Designer and Estimator or choose Unassigned. All Employees can be changed from the Contacts - Employees tab.
Select the appropriate Sales Phase from the dropdown – the default item is set in the Sales Phase setup page.
The Phase Start Date and Phase Due Date will automatically be set by the system. The start date is set to today’s date and the due date is based on the default duration configured for that sales phase.
Enter the Project Budget for the opportunity. This number could be the budget specified by the customer or could be based on the scope of work that the customer has asked for. This will be used when doing forecasting and pipeline management.
The Probability is also set to the default setting. All pre-filled items can be changed from the Settings tab.
If the customer has specified a time frame for the work, it can be entered into the Requested Start and Requested Finish fields.
Select where the lead came from by choosing the Lead Source drop down menu and enter the details, if applicable. The Lead Source is important when evaluating your marketing and qualification strategy. In the Source Details area, you can add any pertinent details.
Enter any Private Notes which can be any information that you would like to include regarding this Opportunity, these notes will appear in the Opportunity Notes section when you create an estimate for the opportunity.

7. Now you have 5 options after you input your Opportunity Information:
• If you need to leave the computer for a few minutes, click Save. You will be in edit mode, continue from Step 6 in the Edit Opportunity Information section for more details
• If you are done entering the Opportunity Info and want to create an estimate, click Save and Create Construction Estimate for more information go to the Construction Estimates Area
• If you are done entering the Opportunity Info and want to create an estimate, click Save and Create Maintenance Estimate for more information go to the Maintenance Estimates Area
• If you would like to create a task for this new Opportunity, click Save and Create a Task
• If you want to discard the addition, click Cancel .