The anticipated scope of work to be performed for the length of the contract with the customer has been defined by the maintenance estimate. Once the customer accepts the contract the estimate can be won, and the Job will be created.
Jobs are instead found under the Production > Jobs menu. The jobs menu contains all 3 job types: maintenance jobs, construction jobs, and non-contract jobs. To narrow down the list of jobs, use the search bar to search for a specific job, or use Views to create views which narrow down the list based on specific criteria (only open maintenance jobs, all closed jobs, only jobs associated with a specific crew or supervisor or other options).
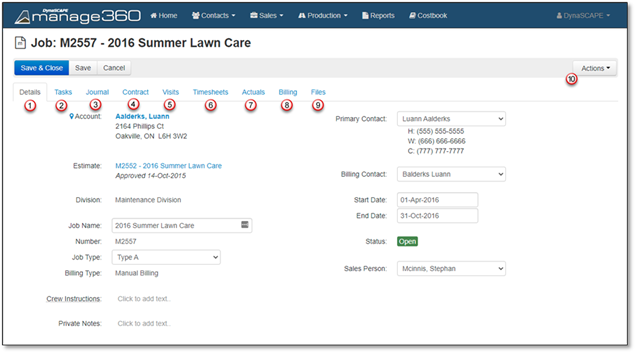
Once the Job in opened, the following information will be displayed.

1. Details – This area contains basic information about the job. The majority of this has been brought forward from Account, Opportunity and Estimates.
•Ensure that the Job Name is relevant
•Assign an appropriate Job Type
•Correct Billing Type is set
o (If not, go to Actions > Change Billing and adjust the billing type). This can only be done prior to any invoicing.
•Crew Instructions are accurate and up to date. These apply to the entire Job (each Service in the Job can also have their own specific instructions)
•Job Dates are correct.
o Start Date: The job start date defaults to the date set on the Estimate. This can be adjusted as necessary so that the start date specifies a date when the work is eligible to begin
o End Date: This is set based on the Estimate. It is best to pick a date beyond which more work is not expected to be completed. This should also correspond with the end of the contract – after which it could be renewed. The job end date can be adjusted at any time. Once the End Date has passed and there are not any more open Work Orders, the Job will be closed. The job end date may not go beyond one year from the job start date.
2. Tasks - This area displays tasks specifically linked to this Job that have been added by you or by other DS|Manage360 users. You can also click +New Task Button to add a task for this Job. For more information on tasks look over Add a Task.
3. Journal - This area displays recent activities linked to this Job such as when accounts, opportunities or estimates have been added, jobs that have been won, etc. You can create a new journal entry by clicking +New Entry. For more information on journal look over Journal Entries.
4. Contract - The contract tab of the maintenance job serves two main purposes - it allows you to view the services that are part of the contract, as well as make some adjustments to the contract.
•The services will initially be collapsed into a summary view when the tab is opened. Click on the name of the service to expand it to see additional details
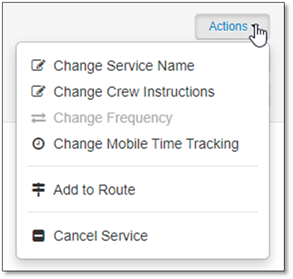
•To make changes to the setup of a service on the contract, select the Actions button on the right side of the screen next to the service.

Some actions may not be available depending on the setup of the service, or if it has been already scheduled or used on a route.
•Change Service Name: rename the display name of the service
•Change Crew Instructions: edit the crew instructions, and if the service is recurring (has more than one visit) and already scheduled, an effective date for the change in instructions can be used
•Change Jobsite: change the jobsite at which the service is meant to be performed if necessary
•Schedule: schedule the Service from here. Typically, the best place to schedule Services is by adding to a Route or to do it from the Calendar
•Change Frequency: this option is only available for in contract, recurring services. It can be used to do things such as change the frequency from weekly to biweekly, or weekly to monthly
•Change Mobile Time Tracking: if the way that the Service is going to be tracked (by Service or by Labor Type) needs to be changed, it can be done here
•Add to Route: add the service to a pre-existing route using this button. It will be disabled if the service had already been added to a route
•Cancel Service: if the service is no longer going to be performed, cancel it so that it is removed from the contract. It will delete any open (incomplete) visits from the job. Set a cancellation date, so that only visits that are unscheduled, or services that are scheduled after the cancellation date are removed.
5. Visits - The visits tab lists all individual work orders that are included as part of the contract. The scheduled date, completion progress, and other details of these visits can be viewed here. Additionally, scheduling and assigning crews to individual visits can be done.
•Contracted services will appear on the visits tab automatically. Other types - as needed, on demand or extra visits - are not included on the visits tab when the job is created. They will be displayed here once they have been created

•Clicking on the Date or Crew of a visit will allow you to schedule and assign a crew, as long as the Visit is not already on a Timesheet or assigned to a Route
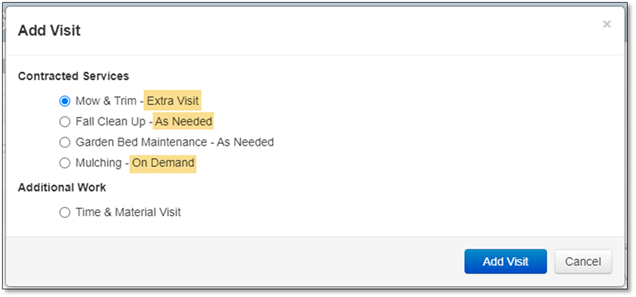
•Clicking on the + Add Visits button will bring up a list of services included as part of the contract that can have visits created.
o Contracted Services: Create and extra visit for included services, or visits for As Needed or On Demand services.
o Additional Services: Add a Time & Material Visit.

6. Timesheets - The timesheets tab allows you to view all timesheets associated with this job (and therefore all days that this job was ever worked on), as well as the status and contents of those timesheets. Clicking on the blue date link on the left of the page will take you to that timesheet.

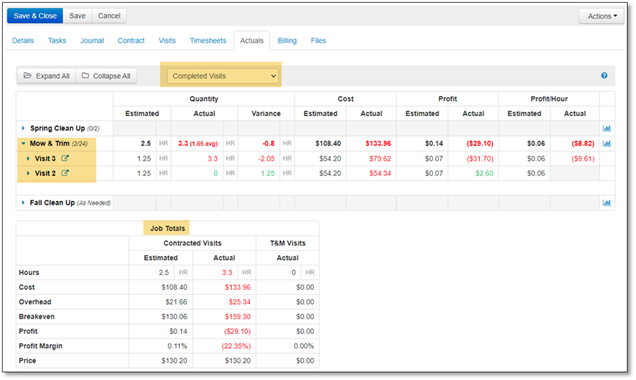
7. Actuals - The actuals tab lists the estimated vs. actual (or in the case of T&M, only the actual) values of services as well as their individual visits. Totals for the entire job are located at the bottom of the page.
•The filter at the top of the tab can be used to view the values of completed visits only, or of all visits overall
•Services can be expanded by clicking on the service name to view the individual visits. Clicking on an individual visit will expand it to show the total contents of the visit.

8. Billing - Create new invoices and view historic invoices.
•Billable items will appear in the Ready To Be Invoiced section. Items will become ready for billing under the following conditions:
o Manual or Per Visit billing: Visits will become billable once they are marked as closed. If the visit is on a timesheet, the visit must be closed, and the timesheet must be approved before it will become billable
o Periodic Billing: Periodic billing instalments will become ready for billing based on the payment date (defined on the billing tab of the original estimate) as well as the value for the "Settings > Accounting Settings > Show Future Billable Items" field
o As Needed, On Demand, Extra Visits, and Additional Work will always be billed per visit. This means that you may have, for example, a combination of monthly instalments plus individual billable visits.
•To create an invoice, select one or more billable items, then click the + Add Invoice button. If more than one billable item has been selected, then those items will appear on a single invoice
•Existing invoices for this job can be viewed from the Invoices section.
9. Files - Upload documents and photos associated with this job. Please see the File Attachment section to get more information.
10. Actions – Any additional actions that can be done to the Maintenance Job will be found here.
•Reports
o The work order report is the only report available on a maintenance job.
•Renew Job
o This button will renew the selected Job. For bulk renewals use the tool located under Production > Renewals.
•Change Billing
o Adjust the billing of the Job. This option will be unavailable if invoices already exist.
•Cancel Contract
o Delete any upcoming visits, billable items, and close the job.
•Delete Job.
o Delete the Job. The linked Maintenance Estimate will be re-opened. This option will be unavailable if the job has timesheets, completed visits, invoices, or is used on a route.
If any options are disabled, hover the mouse over that option and a tooltip will appear explaining why the option is unavailable.