To add material to the Costbook follow these steps:
1. Click on Costbook.
2. Click on Materials.
3. Click the New Material button to open the input screen.

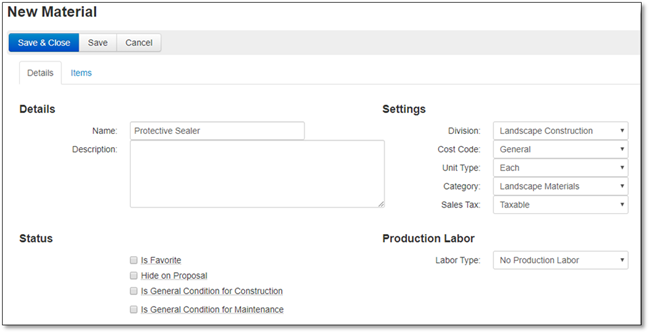
4. Once the Material input screen appears you can enter information into the Details Tab and the Items tab, each tab is explained below:
Details Tab
In the Details tab you can enter the information pertaining to this Material as outlined below:
Details section: Enter the Name, Number and Description (optional).
Settings Section:
Choosing the Division will set the Purchasing Tax & Sales Tax, but you can choose to change either of these taxes.
You can choose a Cost Code which is used for tracking job costs on your Timesheet/Job Log, if you have the Job Management Module.
Choose the Unit Type and Category from the drop down list.
Status Section:
You can choose to set this as a General Condition, which enables this cost to then be spread across the estimate automatically, so they are evenly distributed across your different work areas.
You can choose to set this as a Favorite so that when you are adding this to an estimate, you can choose to filter by your favorite materials.
You can choose to Hide on Proposal if you do not want to see this item on your proposal.
Production Labor:
If this material requires labor to install, then you can choose a Labor Type which will then give you options to input how many hours it would take to install this material. You can choose a Labor Type from the drop down then you can enter the following:
Hours/Plant: How long it takes to install the Material measured in hours.
Round to (Hrs.): The precision on how to round the hours.
Default Billing Section: The way the way that the item will be billed to the customer. Future modules will have different billing options.

Items Tab
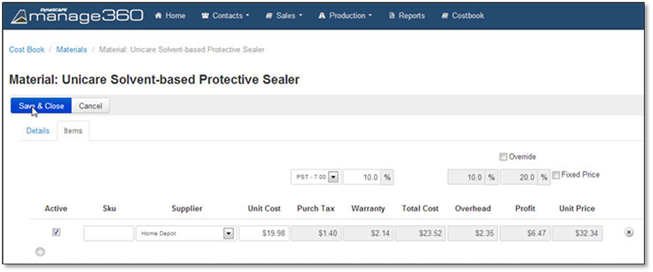
The Items tab allows you to enter materials that may have a different supplier and price, the item entry is outlined below:
At the top of the items screen you will be able to change the default Purchasing Tax, Warranty %, Overhead Markup %,Override and set the Profit Margin or set the Material to be Fixed Price, each is explained below:
The Purchasing tax will be set based on the Division that was set in the Details tab, but you can change this by choosing a different tax from the dropdown.
The Warranty percentage is used to calculate the added expense of replacement cost of warranty items, you can type in a new value from the default if the Warranty % is higher or lower for this item.
The Overhead percentage is set based on the Division setting and cannot be overridden, this ensure the full overhead amount is recovered based on the division setting.
The default Profit Margin is set based on the Division setting but can be overridden by clicking the Override checkbox then entering a new percentage.
You can override the price by clicking on the Use Fixed Price checkbox and entering a price manually.
Once you have kept or changed the default settings for the item, you can now enter the details for each Material:
You can set whether the item will be Active or not by checking or un-checking the Active box
Entering a SKU for the Material is helpful when you are updating the cost for the next year, but this is optional.
You can choose a Supplier from the drop down list, if your Supplier is not listed you can enter a new Supplier, further details is located in the Create a Supplier area.
Enter a Unit Cost, the system will automatically calculate the Unit Price using the Overhead and Profit to the unit cost to calculate the unit price.

Click the  to add another Material that could be
from a different supplier, or which has a different cost, for more details see
the Add Multiple
Suppliers for a Material section below.
5. Click the Save and Close button to save the Material to the Costbook or Cancel if you would like to discard the entry.